
I am asked to provide exhibits at a number
of shows and events throughout year. As
far as possible I like to take along an observation hive. It is an excellent
way to allow the public to interact with bees.
People can view the bee colony close up without needing protective
clothing and as beekeepers we can talk about the way the colony works.
For many years I have borrowed observation hives, but this year I decided that it was time I got my own one. All the events I go to are one or two day events, so I was looking for a temporary observation hive with one visible frame with glass on each side. The queen is trapped on this frame, but the workers can go down through a queen excluder to get to another 5 or 6 frames in a nucleus box below. I think this is enough of an approximation to a ‘normal’ hive to keep the bees trapped inside for a day. I don’t have a requirement for a permanently installed observation hive where the bees can fly out.
 |
| My observation hive in use. Our stand won second prize! |
For many years I have borrowed observation hives, but this year I decided that it was time I got my own one. All the events I go to are one or two day events, so I was looking for a temporary observation hive with one visible frame with glass on each side. The queen is trapped on this frame, but the workers can go down through a queen excluder to get to another 5 or 6 frames in a nucleus box below. I think this is enough of an approximation to a ‘normal’ hive to keep the bees trapped inside for a day. I don’t have a requirement for a permanently installed observation hive where the bees can fly out.
There are a number of companies who make
observation hives, for example http://www.observationhives.co.uk
who make a lovely hive for £280.
However, I decided that I wanted to make my own OH, partly so I could
make it to my exact requirements, but also so I could justify the purchase of a
table circular saw, which I have always wanted!
This posting is not a complete set of
instructions about how to make an OH, just some things that I found out along
the way that may save other people some time.
My requirement was for the main body to be
the same size as a standard nuc box. I
made two of these bodies so that I could use them to keep a colony in during the
summer. Then when I wanted to use the
OH, I just needed to find the queen, put her on a good example frame, and put
it in the top. Then I could just clip
the top on and take the entire hive to the show (having first closed the
entrance). At the time this seemed like
a good idea, but I have actually not used the hive in this manner, because the
flying bees from the nuc have nowhere to go back to when the hive body has been
removed. I therefore now take most of the
frames out of a static hive, which leaves somewhere for the flying bees to
return to during the day.
I wanted plenty of ventilation to the hive,
so I have a stainless steel mesh as the base and mesh covered holes at the top
of the hive. This gives a good airflow
when the OH is being used inside a hot marquee at a show. I can squirt water into the top of the hive
using a water mist spray. If the bees
rush up to the water and start drinking it I know they are getting hot. If they ignore it then everything is OK. I
got the stainless steel mesh from http://www.inoxia.co.uk/products/mesh/sheets/8-mesh
they were happy to sell me exactly the right size sheets, so I didn’t need to
cut the mesh out of a larger sheet (nucs need 18” by 10” which is inconvenient
for cutting out of any sheets sold for a full sized beehive!)
I went to my local glass merchant (http://www.romanglass.co.uk/ in Bromsgrove)to discuss the best glass to
use. They recommended laminated
glass. This is made of two 3mm panes of
glass with a central plastic film. The
advantage to this type of glass is that if it is broken it remains in one
piece, so the bees cannot escape.
Toughened glass is stronger, but, if broken is designed to shatter into
lots of small pieces. Not ideal if you
really wanted the bees to remain in the hive! Good job I went there first,
because it determined the size of the grooves that I needed to cut to hold the
glass in (the glass is 6.4mm thick).
Incidentally, my local glass merchant was happy to cut glass to the
nearest mm (ie not rounded to 5mm) and also rubbed off the sharp edges of the
cut glass so that I would not cut myself when loading the bees.
The nuc hive design I took from Roger
Patterson’s design on http://www.dave-cushman.net/bee/roger_nuc_box.html
The only thing to watch out for is that you need to modify the dimensions
slightly if the wood you use is not 19mm thick.
I got all my wood second hand from a great recycling centre in Worcester
called ‘Worcester Resource Exchange’ (http://www.wre.uk.com/). It turned out
that most of the wood was actually offcuts of Ikea shelves, which were perfect
for the job.
The design for the top ‘observation’ part
of the hive came from http://www.beehacker.com/wp/?page_id=888
I didn’t realise it at first, but writer of this article is in the US. He complains about the difficulty of getting
the clip fasteners to hold everything together and about how he had to get them
sent from England. The company he used
was http://www.protex.com It turns out this
company is in Redditch, a few miles from my house, so I was able to go the
factory and buy everything I needed!
So, onto the building!
 |
| The 'Observation' part of the hive |
I made this part before I bought the
glass. I then cut a cardboard template
for the glass so I could be sure that a rectangular piece of glass was going to
fit. If I was making it again, I would
make the large pieces of wood that support the lugs of the frame a little
thinner, because the glass rubs against them when you slide it in. You don’t want to leave too much of a gap, or
bees will get in it, but a couple of mm would make the glass fit easier.
It looks a little unstable, but in use,
there is a top board, which is clipped on and makes it all secure.
As you can see, I went for security over
elegance and everything is held together with both screws and glue. I bought stainless steel screws from
Screwfix, so that if the bottom part of the hive was used as a nuc there would
be no rust stains. (http://www.screwfix.com/c/screws-nails-fixings/stainless-steel-screws/cat7270018)
I built everything and varnished it with
several coats of Sadolin Extra Durable Clearcoat (http://www.sadolin.co.uk/products/sadolin-extra-durable-clearcoat/)
This gave a great finish, with a slight ‘warming’ of the wood colour, even
though it is described as a clear coat.
I found that it did eventually dry rock solid, but it worried me for
about a week because it still felt soft when touched.
I suggest trying out the fixings on a scrap
piece of wood before you screw them in, because the tightness they clip
together is dependent on the spacing you fix them with.
 |
| Testing the clips on scrap wood |
I found that the clips were correct if you
spaced the two parts as shown in the photo, so that the catch was at right
angles when the two parts rested together.
 |
| Clip with safety catch |
Here you can see the fastened clip with the
stainless steel safety catch (like a big safety pin). The safety catch is a vital part of the
mechanism as it stops small fingers from finding out what happens if you flip up
the catches when the OH is full of bees!
I bought them from Protex, but you probably could use a big safety
pin. The hole is already drilled if you
buy the right clips.
The part numbers I used were:
Clips:
18-2075SS
Catches: 01-613SS
Safety catch: 613/7SS
Because I wanted to be able to use the
bottom of the OH as a conventional nuc, I needed to have an entrance for the
bees that I could seal up at shows. At
the Protex factory I found a larger clip which worked perfectly to keep a cork
in place. I used the sort of cork you
get on liqueur bottles where the cork has a decorative top (in my case a wooden
cap) so that the cork cannot be pushed all the way into the hive.
 |
| Flight hole closed and secured |
This shows the extended clip covering the
flight hole with cork in it. Note the
safety pin in place.
 |
| Flight hole open |
Here the cork has been removed so that the
bees can fly. Note how the safety pin
can be used to hold back the clip so that it does not blow around in the wind
and get in the way of bees entering the hive.
The part number for this toggle clip is
18-2430SS and of course you will need the 01-613SS catch at the other end and a
613/7SS safety clip
Finally
.. with bees in it!
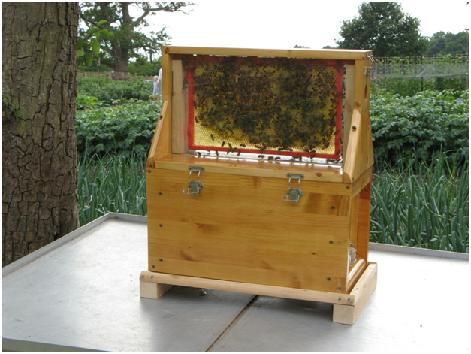 |
| Observation hive in use at Hanbury Hall |
The finished hive, complete with bees, in
the walled garden at Hanbury Hall. The
only thing I have had add to the hive is the detachable stand at the base (not
yet varnished). The stand allows air to
get up through the bottom of the hive so that a convection draft can cool the
bees on a hot day. Obviously the hive is
kept out of the sun (under a tree here) but it is still difficult for the bees
to ventilate if they cannot get out to fan air into the hive.
I have only had it for a couple of months,
but I am really enjoying my observation hive.
Not only is it great for showing non-beekeepers what goes on in the
hive, but I have been able to watch a queen lay eggs in cells, and watch
workers as they manipulate wax in their mandibles and build new comb. The only thing I have not worked out yet is
how to take photos through the shiny glass without getting reflections. Clearly a work in progress for that one!